HData Compliance Overview
HData Compliance helps automate quarterly and annual FERC filing preparation.
By automatically converting your staged values in the Excel Upload Template to the required XBRL format via import, you can benefit from fast, accurate filing—without the need for specialized XBRL coding expertise.
This article serves as an introductory user guide for those preparing the filing. Also see guides for:
Step 1: Review Completed Steps
Before you get started preparing the filing, it’s important to note the steps that have already been performed by your organization’s filing process owner.
At the stage of your involvement, the process owner will have already completed the following tasks:
- Created the XBRL instances of the forms being prepared
- Granted applicable user permissions
- Rolled forward information from previous filings
- Created the Excel template where numbers will be staged for final upload
Step 2: Getting Started
Now, it’s your turn to get involved.
The content below covers everything from annotating the Excel form, uploading it to the HData platform, validating the document for errors, and updating the schedule status.
Screenshots are included to further illustrate each step in the process.
2A) Enter Data into the Excel Form for Upload
Your work starts in Excel.
Here, you’ll populate the schedules with data and add footnotes to your data points as needed.
IMPORTANT: Be sure the Tab names in the Excel Upload Form remain completely unaltered. The HData upload process relies on that exact naming convention to place data into the correct schedules within each form.
To add a footnote to any data point in the sheet, add a comment to the corresponding cell in the Excel Import Form. You can do this by right clicking the cell and selecting “New Comment” from the menu that appears as shown below. Then, add the text in the comment box.

This next section is for reference only, no action needed.
Later, when the form is imported to HData, any comments you added will be automatically converted into footnotes. In HData, they’ll look like this:

When you’re logged into HData, you can see how many footnotes have been added to a document and in what sections from the document’s main navigation.
You can also see footnotes from the Navigation Panel: 
Once all your data is entered into the Excel Form, and any footnotes you wanted to add have been captured, it’s time to upload that form into HData.
2B) Log Into the HData Platform

Navigate to https://login.hdata.us/ and select “Compliance” from the app menu.

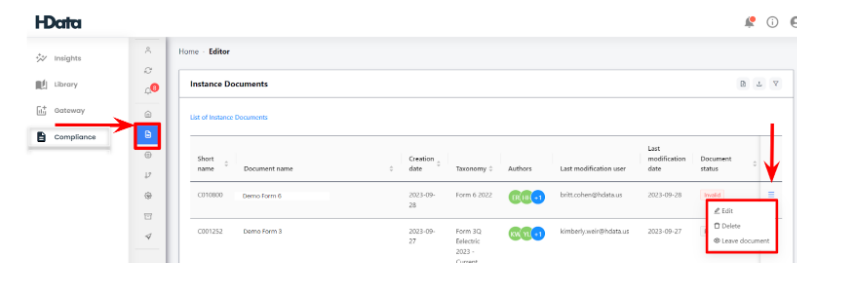
Step 3: Access Your Form
Select “Editor” from the “Compliance” menu to open the list of documents available in your account. Find the desired document, select “Menu” and then “Edit” to open.
Step 4: Import Your Excel Form
Remember that Excel form you were populating? It’s time to import that data here to HData.
When you import the Excel Form, the values from designated input cells are brought into the HData XBRL instance of the form. Importation also tags each value with the appropriate XBRL concepts. And it converts Excel comments into footnotes, visible in the web-based form.
To begin, find the menu at the top of the instance document in HData, click on "Import."
The “Import Excel template” menu will open. It prompts you to select a file to upload.
Navigate to the file stored on your computer, select it, and click "Open."
Next, toggle the “Import all schedules” option from right to left. 
A list of all schedules will be revealed. Select the ones you’re ready to upload from your current Excel Form. 
IMPORTANT: Be sure to only select the schedules you have prepared for upload.
Once you have selected the schedules you need to import and reviewed the list for accuracy, click the “Import” button in the lower right corner.

Your upload can take a couple of minutes. This is normal. The loading screen will look like this:

When the import is complete, a summary screen will open, confirming the number of facts imported and any resulting errors or warnings found in the data during import.
The summary can be downloaded to review offline.
NOTE: The option to download this copy is only provided once, so take care in your answer here.
Once imported, the data from the Excel template is displayed:
NOTE: If another collaborator is editing in the HData platform while the Excel import process is being initiated, the system will send a message stating that the template could not be imported. Contact your process owner to assist you with unlocking the schedule for editing.

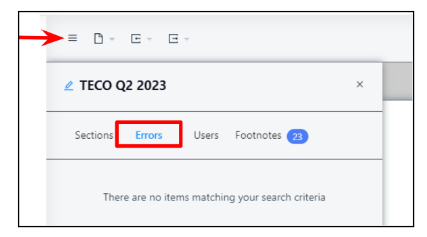
Step 5: Validate and Clear Errors
Now you can validate the document to ensure there are no errors.
Running the validation function automatically checks the XBRL-encoded data against taxonomy rules. The validation function in HData Compliance uses the same XBRL validation tool as the FERC (Xule XBRL Validation).
If errors are detected during this process, you can view them by navigating to the menu button, which expands the Form outline.
Step 6: Download and Save a Copy
To save the digital document as a PDF file, start with the document open in the HData Editor. Then, click the “Export” button and select “iXBRL.” 
You will get a notification that the export is in progress.

Open the resulting download in Chrome or your preferred browser.
From your browser’s “File” menu, select “Print.” Choose the "Save as PDF" option. Then, adjust the "More Settings" options as follows:
- Set “Margins” to “None”
- For “Scale,” select “Custom” and set it to 87

Step 7: Update Schedule Status
Schedule status is designed to facilitate managing the form preparation across multiple users. Each schedule in the form has it’s own status indicator. To update the status, simply click the dropdown and choose the correct status based on your internal process.

Step 8: Complete the Sign-Off Process
Once all of the steps above have been completed, the designated Filing Process Owner for your organization will handle the sign-off and FERC Filing process.
Questions? Let Us Know
Hopefully this article gave you all the information you needed to be successful with the HData Compliance app. If you still need help, please reach out to us at support@hdata.us.